- You are here:
-
Joomla! Tutorials

-
Joomla! 2.5
-
Module Manager
- Embedding HTML Code (Joomla 2.5)
Module Suffix (Module Styling Box)
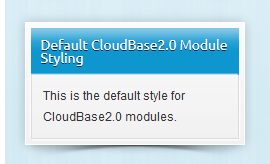
The Cloudbase 2.0 template comes with a pre-designed module “chrome” or styling element. The image below demonstrates what that looks like:
Sometimes you may not want your module to have the box styling element around it. You can easily change this by adding a Module Suffix to the module and then adding some simple CSS rules to the bottom of your template.css file. This article illustrates how to add a Module Suffix and how to apply CSS to your template's style sheets. Once you set up this style, you can reuse the suffix on every module that you want to display the same way. Please note that this document illustrates how to do this using a CloudAccess.net template. This process will be different based upon the template you are using.
Adding a Module Class Suffix
Adding CSS to Create a Custom Module Style
Adding a Module Class Suffix
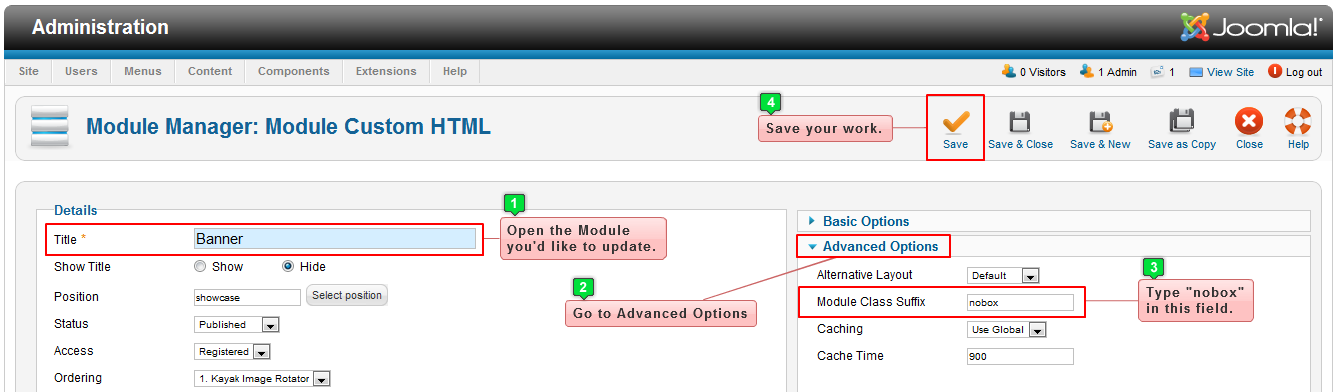
To get started, you'll want to go to the Module Manager after logging into the Administration area (the back end) of your site. Then, open the module that you'd like to work with. Default Joomla modules have the Module Class Suffix setting located under the "Advanced Option"s tab in the parameters area (on the right side of the editing screen). 3rd party modules and extensions may have this located under a different tab. To turn off the box around the module, type the word “nobox” without quotes into the Module Class Suffix field and then save your work.
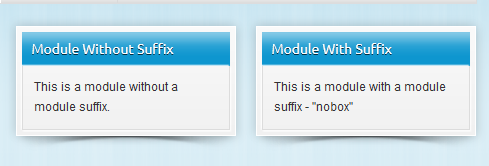
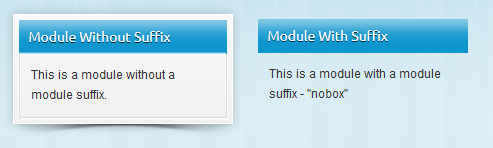
If you return to the front end of your site, it will appear that there is no difference at all. Below is an image of two modules, one without a suffix and one with a suffix.
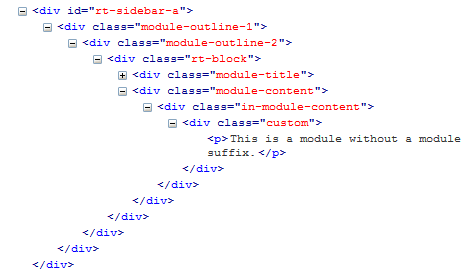
There is a difference though. If you look at the HTML source code for each module you will see that the Module Class Suffix has been added to the module.
Below is an image of the HTML source code without the suffix
And this is and image of the HTML source code with the suffix added. You can note the difference between the code in these two images.
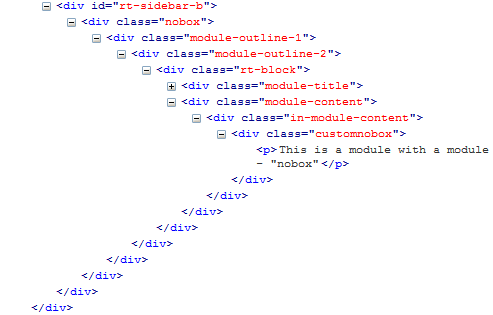
As you can see in the source code, the “nobox” class suffix shows in two places. It is added as a specific container that goes around the whole module, and it is also added to the “custom” class that Joomla automatically gives the container that holds the content of the Custom HTML module.
Back to Top
Adding CSS to Create a Custom Module Style
The CSS that gives the box its style is located in the template.css file. The CSS code looks like this:
#rt-feature .module-outline-1, #rt-maintop .module-outline-1, #rt-mainbottom .module-outline-1, #rt-sidebar-a .module-outline-1, #rt-sidebar-b .module-outline-1, #rt-sidebar-c .module-outline-1 {
background: url("../images/left-bottom-shadow-small.png") no-repeat scroll left bottom transparent;
}
#rt-feature .module-outline-2, #rt-maintop .module-outline-2, #rt-mainbottom .module-outline-2, #rt-sidebar-a .module-outline-2, #rt-sidebar-b .module-outline-2, #rt-sidebar-c .module-outline-2 {
background: url("../images/right-bottom-shadow-small.png") no-repeat scroll right bottom transparent;
padding-bottom: 13px;
}
#rt-feature .rt-block, #rt-maintop .rt-block, #rt-mainbottom .rt-block, #rt-sidebar-a .rt-block, #rt-sidebar-b .rt-block, #rt-sidebar-c .rt-block {
background: url("/../images/module-gradient.png") repeat-x scroll left bottom #FFFFFF;
border: 1px solid #FFFFFF;
box-shadow: 2px 2px 9px rgba(0, 0, 0, 0.1), -2px -2px 9px rgba(0, 0, 0, 0.1);
padding: 5px;
}
#rt-sidebar-a .module-content, #rt-sidebar-b .module-content, #rt-sidebar-c .module-content {
-moz-border-bottom-colors: none;
-moz-border-image: none;
-moz-border-left-colors: none;
-moz-border-right-colors: none;
-moz-border-top-colors: none;
border-color: -moz-use-text-color #DCDCDC #DCDCDC;
border-right: 1px solid #DCDCDC;
border-style: none solid solid;
border-width: 0 1px 1px;
box-shadow: 1px 1px 1px #FFFFFF, -1px -1px 1px #FFFFFF;
padding: 11px;
}
You can work from CSS above by copying and pasting it into the bottom of your template.css file. You can then edit the statements to include the new Module Class Suffix .nobox . Your CSS will look something like the code below.
/* Remove Module Box Styling */
#rt-showcase .nobox .module-outline-1, #rt-top .nobox .module-outline-1, #rt-feature .nobox .module-outline-1, #rt-maintop .nobox .module-outline-1, #rt-mainbottom .nobox .module-outline-1, #rt-sidebar-a .nobox .module-outline-1, #rt-sidebar-b .nobox .module-outline-1, #rt-sidebar-c .nobox .module-outline-1 {
background: none !important;
}
#rt-showcase .nobox .module-outline-2, #rt-top .nobox .module-outline-2, #rt-feature .nobox .module-outline-2, #rt-maintop .nobox .module-outline-2, #rt-mainbottom .nobox .module-outline-2, #rt-sidebar-a .nobox .module-outline-2, #rt-sidebar-b .nobox .module-outline-2, #rt-sidebar-c .nobox .module-outline-2 {
background: none !important;
}
#rt-showcase .nobox .rt-block, #rt-top .nobox .rt-block, #rt-feature .nobox .rt-block, #rt-maintop .nobox .rt-block, #rt-mainbottom .no box .rt-block, #rt-sidebar-a .nobox .rt-block, #rt-sidebar-b .nobox .rt-block, #rt-sidebar-c .nobox .rt-block {
background: none !important;
border: none !important;
box-shadow: none !important;
}
#rt-sidebar-a .nobox .module-content, #rt-sidebar-b .nobox .module-content, #rt-sidebar-c .nobox .module-content {
border: none !important;
box-shadow: none !important;
}
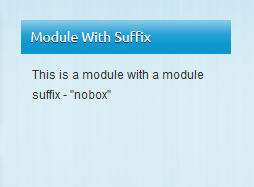
After you change the CSS code, be sure to save your work. You can now return to the front end of your site, and the module with the Module Class Suffix will now look like the image below.
You can create any number of styles of module "chrome" this way by using a Module Class Suffix. Simply name your suffix and then copy the above into the bottom of your template.css file, replace the .nobox in the statements with your chosen suffix, then edit or create the styles that you wish to use.
Back to Top
Knowledgebase

100% FREE
Joomla & WordPress
Hosting
- Launch Instantly
- Free Subdomain
- Free Training
- Free SSL
- 500MB Space
- 1CPU/1GB RAM
- FTP Access
- MySQL Access

Do you have suggestions for improving this article?
We take a great deal of pride in our knowledgebase and making sure that our content is complete, accurate and useable. If you have a suggestion for improving anything in this content, please let us know by filling out this form. Be sure to include the link to the article that you'd like to see improved. Thank you!